

ในบรรดาแบรนด์เนมนาฬิการะดับโลก เชื่อว่าทุกคนจะต้องรู้จักแบรนด์นาฬิกาแอร์เมสแน่นอน เพราะนาฬิกาแบรนด์นี้ขึ้นชื่อเรื่องความเชี่ยวชาญในการผลิตนาฬิกา อีกทั้งดีไซน์ของนาฬิกาที่มีความแฟชั่น มีลักษณะที่เฉพาะตัว แถมราคาของนาฬิกาก็เลื่องชื่อในราคาที่แพง ซึ่งวันนี้เราเลยมีนาฬิกาแอร์เมสสุดหรูมาให้คุณ 5 นาฬิกาแอร์เมส ดีไซน์เก๋ ไม่ซ้ำใคร Heure H มาที่นาฬิกาแอร์เมสรุ่นแรกกันดีกว่าอย่าง Heure H ถือเป็นนาฬิการุ่นที่ออกแบบอย่างสร้างสรรค์โดย ฟิลิปป์ มูเกต์ ดีไซน์เนอร์เลื่องชื่อที่ออกแบบตั้งแต่ในปี 1996 ดีไซน์ของนาฬิกาที่ออกแบบพิเศษเป็นตัว H ที่เป็นสัญลักษณ์ย่อของ แอร์เมส โดยคอนเซ็ปต์ของนาฬิกามีความชัดเจน ซุกซน ตัวเรือนให้ความรู้สึกฮึกเหิม กรอบเป็นตัวอักษร H ผ่านการเคลือบเงาเป็นสีดำและสีขาว Arceau Cavales เป็นนาฬิกาที่เป็นคอลเลชั่นอาร์โซ ที่ความโดดเด่นอยู่ที่เป็นหนึ่งในผลงานการออกแบบของ Henri d’Origny Arceau ซึ่งนาฬิกา Arceau Cavales มีความคลาสสิคออกเป็นโทนสีขาวและสีดำ แต่ยังคงความหรูหราเอาไว้ ซึ่งตัวนาฬิกาออกแบบมาในคอนเซป ที่มีความย้อนแย้งในตัวเอง ทั้งในเรื่องของระเบียบวินัย เข้มงวด มีความคิดสร้างสรรค์ Arceau Casaque อรกหนึ่งนาฬิกาที่เป็นผลงานของ Henri d’Origny Arceau ออกแบบในปี […]

ช่องทางการ สั่งของจากจีน1688 ที่เชื่อถือได้
สำหรับใครที่ต้องการสร้างรายได้ให้ตัวเองด้วยการค้าขายของขายสินค้าใดๆก็ตามวันนี้เรามีอีกหนึ่งช่องทางการสั่งของจากจีน1688 มาแนะนำให้คุณได้ลองเข้ามาทำความรู้จักเผื่อว่ามันจะเป็นอีกหนึ่งตัวช่วยดีๆที่จะทำให้คุณมีสินค้าเพื่อนำมาขายและสร้างรายได้ให้กับตัวเองได้มากขึ้นซึ่งช่องทางการสั่งของจากจีน1688 ที่เราอยากจะแนะนำให้คุณได้รู้จักนี้เป็นช่องทางที่เชื่อถือได้มั่นใจได้เลยว่าคุณจะได้รับสินค้าที่ดีมีคุณภาพมาค้าขายต่อและไม่ต้องเป็นกังวลเลยว่าจะเกิดความผิดพลาดในระหว่างการเลือกซื้อหรือการขนส่งเพราะการสั่งของจากจีน1688 ของเราเป็นบริการที่เชื่อถือได้ แถมเปิดให้บริการมาเป็นเวลานานดังนั้นมั่นใจได้เลยว่านี่เป็นอีกหนึ่งช่องทางกันสั่งสินค้าจากจีนที่เชื่อถือได้และดีที่สุดหากคุณสนใจในการสั่งของจากจีน1688 ของเราสามารถเข้ามาดูรายละเอียดเพิ่มเติมในการสั่งซื้อสินค้าหรือถามข้อสงสัยอื่นใดในการสั่งของจากจีนได้ตลอด 24 ชั่วโมงเพื่อทำให้คุณเข้าถึงและเข้าใจในวิธีการสั่งของจากจีน1688 ได้มากขึ้น สั่งของจากจีน1688 สั่งได้ได้ของเร็ว แน่นอนว่าในปัจจุบันนี้การสั่งซื้อสินค้าจากต่างประเทศเป็นเรื่องง่ายและเป็นที่ชื่นชอบสำหรับผู้ที่ชื่นชอบการช้อปปิ้งออนไลน์หรือการสั่งของต่างประเทศมาเพื่อขายโดยเฉพาะการสั่งของจากจีน1688 เป็นอีกหนึ่งช่องทางกันสั่งซื้อที่หลายๆคนให้ความสนใจเพราะว่าสะดวกและรวดเร็วแถมยังเป็นอีกหนึ่งเว็บไซต์ที่เชื่อถือได้ จึงเหมาะสำหรับคนที่กำลังมองหาช่องทางการสั่งของจากจีน1688 นี้เป็นอีกหนึ่งช่องทางที่ช่วยทำให้คุณได้รับสินค้าที่ต้องการได้เอาเป็นว่าหากใครสนใจต้องการสั่งซื้อสินค้าจากจีนสามารถเข้ามาสอบถามรายละเอียดการสั่งซื้อหรือวิธีการสั่งซื้อได้ที่หน้าเว็บของเราเลย เพราะในปัจจุบันนี้การเลือกซื้อสินค้าจากจีนเป็นอีกหนึ่งตัวเลือกดีๆที่จะทำให้พ่อค้าแม่ค้า ประหยัดเงินในการลงทุนซื้อของมาขายได้มากขึ้นเพราะว่าสินค้าจากจีนนั้นเป็นสินค้าคุณภาพดีราคาถูกและมีดีไซน์ที่หลากหลายรูปแบบให้คุณได้เลือกซื้อรับประกันได้เลยว่าหากคุณสั่งของจากจีน1688 มาขายแล้วจะช่วยทำให้คุณมีช่องทางการสร้างรายได้ที่มากขึ้นและช่วยทำให้คุณประสบความสำเร็จจากการค้าขายได้เป็นอย่างดี ยิ่งถ้าคุณได้เลือกสั่งของจากจีน1688 มาขายด้วยจะสามารถทำให้ พ่อค้าแม่ค้ามีสินค้าที่หลากหลายรูปแบบมากขึ้นไม่ต้องกังวลเลยว่าคุณจะไม่สามารถขายสินค้าได้เพราะสินค้าทุกชิ้นที่คุณได้สั่งซื้อจากจีนเป็นสินค้าที่มีคุณภาพเหมาะสมกับราคาที่คุณซื้อมาเอาเป็นว่าหากใครกำลังมองหาช่องทางการสร้างรายได้ดีๆแต่ยังไม่รู้ว่าจะเริ่มลงทุนจากตรงไหนลองเข้ามาสั่งของจากจีน1688 กับเราดูรับประกันได้ว่ามันจะเป็นอีกหนึ่งตัวช่วยดีๆที่จะทำให้คุณสามารถสร้างรายได้และประสบความสำเร็จจากการค้าขายได้มากขึ้น
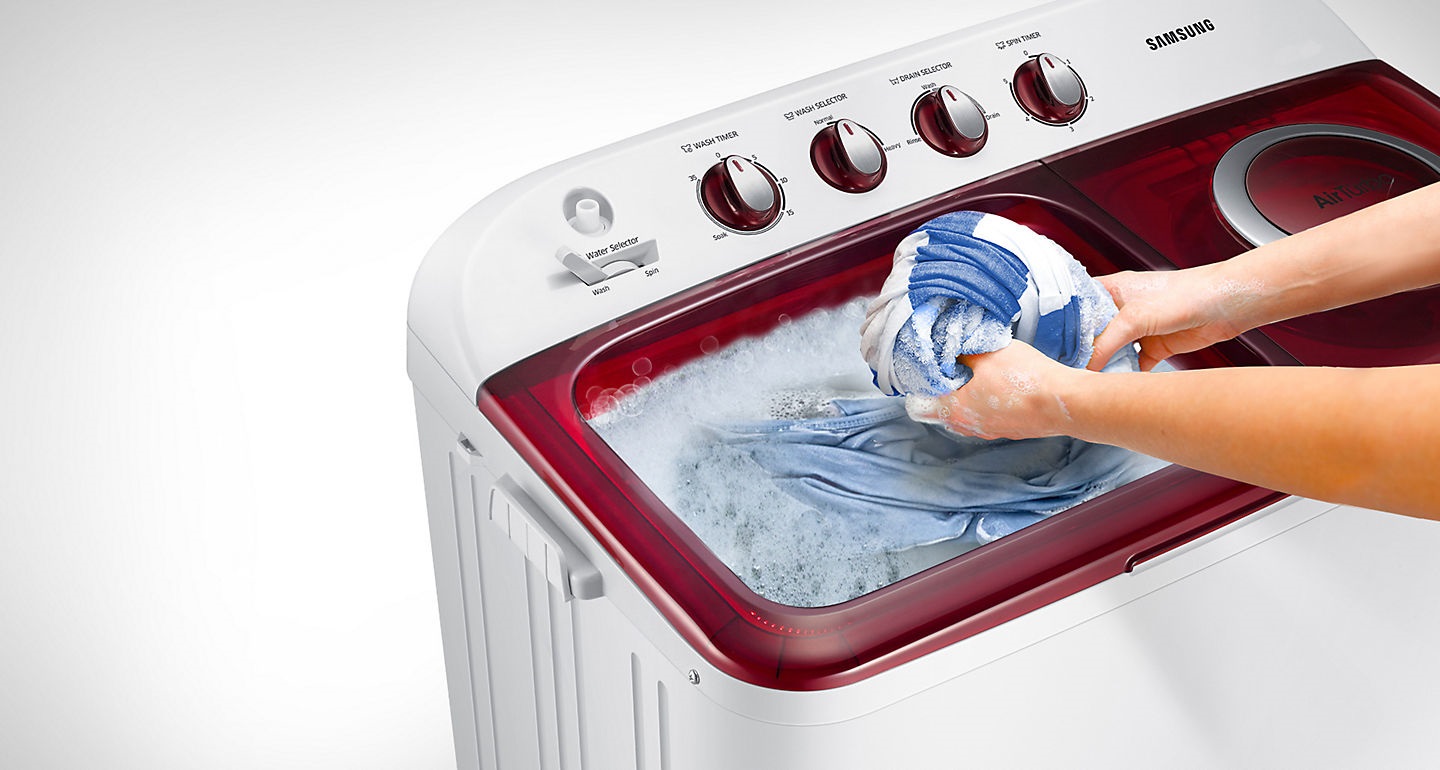
ข้อมูลสำหรับคุณแม่บ้าน คุณรู้จักเครื่องซักผ้า 2 ถังดีแล้วหรือยัง
ในบรรดานวัตกรรมที่เกี่ยวข้องกับเครื่องช่วยทุ่นแรงด้านทำความสะอาด เครื่องซักผ้าเป็นนวัตกรรมที่อำนวยความสะดวก และมีความจำเป็นมากที่สุด โดยรูปลักษณะของเครื่องซักผ้า 2 ถังเป็นรูปแบบที่เรามีความคุ้นเคย และค่อนข้างมีความผูกพันมาก่อนที่เครื่องซักผ้าจะมีนวัตกรรมแบบใหม่ตามออกมา ข้อมูลสำคัญที่คุณแม่บ้านควรทำความรู้จักกับเครื่องซักผ้าแบบ 2 ถังของคุณ จะมีรายละเอียดดังที่จะกล่าวต่อไป เพื่อให้คุณแม่บ้านเข้าใจและใช้งานได้ดีขึ้น และยังช่วยยืดอายุการใช้งานได้อีกด้วย คำถามและคำตอบน่ารู้ เกี่ยวกับการใช้งานเครื่องซักผ้า 2 ถัง เครื่องซักผ้า 2 ถัง หรือชื่ออย่างเป็นทางการคือ “เครื่องซักผ้ากึ่งอัตโนมัติ” ภายในมีลักษณะแยกส่วนกันทำงานนั่นคือถังซัก และถังปั่นหมาด ภายนอกจะมีฝาปิดด้านบน และแผงโปรแกรมสำหรับตั้งเวลาปั่น ด้วยการทำงานง่าย ๆ เช่นนี้ จึงเหมาะกับคุณแม่บ้านที่ไม่ต้องการเทคโนโลยีหรือนวัตกรรมที่ล้ำสมัยมากนัก ต่อไปนี้ไปคำถามที่พบบ่อยสำหรับการใช้งานเครื่องซักผ้าแบบ 2 ถัง มีอายุการใช้งานนานหรือไม่ โดยเฉลี่ยแล้วเครื่องซักผ้าแบบ 2 ถังจะมีอายุการใช้งานประมาณ 10 ปี หรือมากกว่า น้ำหนักที่ระบุบนเครื่องซักผ้าคืออะไร น้ำหนักที่กำหนดบนเครื่องซักผ้าเช่น 8 กิโลกรัม หรือ 12 กิโลกรัม หมายถึงน้ำหนักของผ้า “แห้ง” ที่ถังซักสามารถรับน้ำหนักได้ ซักผ้านวมได้หรือไม่ นี่คือปัญหาระดับครอบครัวเลยก็ว่าได้ สำหรับเรื่องเครื่องนอนกับเครื่องซักผ้า […]
เลือกสีกระเป๋าตัง ตามวันเกิด อย่างไรให้รับทรัพย์
เรื่องดวง เรื่องชะตา เรื่องโหราศาสตร์ ถือเป็นเรื่องที่คนไทยทุกคนเชื่อ และมักจะหาตำรามาอ่านเพื่อทำการเสริมดวงชะตาตัวเอง โดยเฉพาะเรื่องการเงินทุกคนต้องหาสิ่งที่ช่วยให้การเงินรุ่งเรือง รับทรัพย์ตลอดเวลา วันนี้เราเลยมีวิธีเลือกกระเป๋าตัง ตามวันเกิด ประจำปี 2564 อย่างไรให้รับทรัพย์แบบไม่ขาดสายมาฝาก วันอาทิตย์ คนเกิดวันอาทิตย์เป็นคนที่มีความเป็นผู้นำ เป็นคนใจร้อน ทำอะไรรวดเร็ว โดยดวงกสนเงินของคนเกิดวันอาทิตย์จะเป็นคนที่หาเงินเก่ง หาเงินคล่องมือ แต่เวลาใช้เงินทีก็เก่งไม่ใช่น้อย ชอบเปย์ แต่ก็ยังถือว่าเป็นคนเก็บเงินอยู่เหมือนกัน โดยสีมงคลสำหรับคนเกิดวันอาทิตย์ปี 2564 ที่อยากมีเงินเก็บ ใช้เงินคล่องตัว แนะนำให้เปลี่ยนสีกระเป๋าตังเป็นสีโทนดำ สีม่วง สีน้ำตาลเข้ม หรือสีน้ำตาลทอง วันจันทร์ คนที่เกิดวันจันทร์เป็นคนที่มีศิลปะทางวาจาและการสนทนา เป็นคนอ่อนไหวง่าย มีนิสัยขี้งก รู้จักใช้เงิน แต่พอมีเงินก็ใช้เยอะ แต่ก็เป็นคนที่ดิ้นรนหาเงินเก่งพอใช้ โดยแนะนำให้คนเกิดวันจันทร์เปลี่ยนสีกระเป๋าตังนรับทรัพย์เป็นสีแสด สีเหลืองเข้ม สีส้ม และสีทอง หรือถ้าคุณทำธุรกิจค้าขาย อยากให้การค้าเจริญรุ่งเรืองก็ให้เปลี่ยนกระเป๋าตังเป็นสีม่วงหรือสีครีม วันอังคาร คนเกิดวันอังคารเป็นคนที่ทะเยอทะยานและต้องการความก้าวหน้าในหน้าที่การงาน เป็นคนตรงไปตรงมา เป็นคนนิสัยจู้จี้ จุกจิก เรื่องการเงินอย่างมาก เป็นคนประหยัดมัธยัส เก็บเงินเก่ง เลยจะถูกเพื่อนหรือคนรู้จักมักขอยืมเงิน โดยสีมงคลสำหรับคนเกิดวันอังคาร ถ้าอยากให้ดวงเรื่องการเงินปัง ต้องเปลี่ยนไปใช้กระเป๋าตังสีเทา วันพุธกลางวัน […]

ตกงานอยู่ ทำอย่างไรถึงจะได้งานใหม่เร็วๆ
ชีวิตของคนวัยทำงาน สิ่งที่ทุกคนไม่ต้องการอยากเจอก็คือการตกงาน เพราะนั่นคือปัญหาใหญ่เลยก็ว่าได้ ทั้งเรื่องของเงินที่หา และความรับผิดชอบต่างๆ ที่จะตามมา แต่เมื่อมันเกิดขึ้นแล้วเราก็ต้องแก้ไขไปตามเรื่อง และไม่มีใครรู้ว่าเราจะตกงานตอนไหนบ้าง บางคนก็สามารถจัดการตัวเองได้ บางคนก็จมอยู่กับความเสียใจกับการตกงานอยู่อย่างนั้น วิธีที่จะทำให้พ้นจากสถานการณ์แบบนี้ได้ก็คือการสมัครงานเชียงรายให้ได้โดยเร็วที่สุด ที่จะเป็นตัวช่วยให้เรากลับมาอยู่ในจุดเดิมได้ ซึ่งในช่วงที่เราตกงานนั้น หากมีอะไรที่ควรปรับเปลี่ยนหรือว่าเพิ่มเติมเกี่ยวกับนิสัยในการทำงานก็ควรทำทันที เพื่อเป็นการพัฒนาศักยภาพของตัวเอง เดี๋ยวเราจะมาดูกันว่าหากต้องตกงานจริง มีวิธีไหนบ้างที่จะทำให้กลับมามีงานทำได้เร็วที่สุด สิ่งที่ควรทำเมื่อเจอกับการตกงาน 1.เปลี่ยนพฤติกรรมตัวเองใหม่ อันดับแรกเราลองมาดูตัวเองก่อนว่าที่เราตกงานนั้นเป็นเพราะอะไร เพราะนิสัยของเราหรือไม่ หากเป็นเช่นนั้นก็ควรเปลี่ยนนิสัยของตัวเองใหม่ด้วยการทำให้ดีกว่าเดิม อย่างเช่นพฤติกรรมการนอนดึกแล้วไปทำงานสาย หรือว่าไปทำงานแล้วไปหลับในที่ทำงาน จนทำให้เจ้านายเห็นพฤติกรรมเหล่านี้ พอมองเห็นปัญหาของตัวเองได้ชัดเจน ก็ควรเปลี่ยนทันที 2.พัฒนาศักยภาพของตัวเองเพิ่มเติม ระหว่างที่เราตกงานอยู่ จะเป็นช่วงที่มีเวลาว่างเยอะ ดังนั้นวิธีที่เราจะได้งานใหม่โดยเร็วที่สุดให้มองหาช่องทางในการเพิ่มศักยภาพของตัวเอง เพื่อที่จะได้ สมัครงานเชียงราย ได้เร็วกว่าเดิม อย่างเช่นหากรู้ว่าตัวเราเองไม่มีความรู้ความสามารถเกี่ยวกับภาษาอังกฤษ ก็ควรไปเรียนรู้เพิ่มเติม อาจจะไปเข้าคอร์สเรียนพิเศษ หรือว่าจะเรียนผ่านทางออนไลน์ก็ได้เช่นกัน 3.ทำเรซูเม่ใหม่ ถึงแม้ว่าการสมัครงานครั้งแรกของคุณจะยังมีเรซูเม่เหลืออยู่ แต่เมื่อตกงานแล้วสิ่งที่คุณควรทำเพิ่มเติมก็คือการปรับปรุงเรซูเม่ให้ดีกว่าเดิม โดยให้เขียนให้ได้น่าสนใจกว่าที่แล้ว จากนั้นก็ให้ส่งเรซูเม่ไปยังบริษัทที่คุณต้องการทำงานด้วยใหม่ทันที เชื่อว่าคุณน่าจะเห็นผลลัพธ์ของการสมัครที่ดีกว่าเดิมแน่นอน 4.มองหางานที่เหมาะกับคุณจริงๆ เมื่อคุณเคยผ่านประสบการณ์ในการทำงานมาแล้ว คงจะรู้แล้วว่างานไหนที่เหมาะกับคุณจริงๆ บ้าง ดังนั้นเมื่อคุณเจอคำตอบแล้ว การ สมัครงานเชียงราย ในครั้งต่อไปควรเป็นงานที่คุณต้องการจริงๆ จะได้ไม่ต้องฝืนทำเหมือนกับครั้งแรก และก็พยายามทำมันให้ดีทีสุด 5.เข้าเว็บหางานบ่อยๆ หากงานที่คุณต้องการทำยังไม่เปิดหรือเต็มอยู่ ทางที่ดีให้คุณเข้าเว็บหางานเรื่อยๆ เพื่อดูว่ามีที่ไหนอีกบ้างที่เขายังเปิดรับ คุณจะสมัครได้ทันการ อย่าปล่อยเลาไปโดยเปล่าประโยชน์ […]

4 เหตุผลที่ “ลลิตา กรุ๊ป” เป็นมากกว่าบริษัทรับจัดงานแต่งงาน
“ลลิตา กรุ๊ป” เป็นหนึ่งในบริษัทรับจัดงานแต่งในรูปแบของทีมการแต่งงานในแบบของเรือนไทย ให้ความรู้สึกในความเป็นไทยมากกว่า แต่ถ้าถามหาว่า “ลลิตา กรุ๊ป” นั้นมีดีแค่ เรือนไทย หรือไม่ ? ต้องขอบอกว่ามีมากกว่านั้นอย่างแน่นอน ดังนั้นในบทความนี้เราขอพูดถึงข้อดี ของการเลือกใช้ “ลลิตา กรุ๊ป” กันดีกว่าว่ามีข้อดีอะไรบ้าง ความเป็นมืออาชีพ ด้วยการเปิดการให้บริการมาอย่างยาวนานทำให้มั่นใจได้เลยว่า การบริการของทาง ลลิตา กรุ๊ปนั้นมีความเป็นมืออาชีพ ไม่ทำให้งานเสียหาย เป็นหน้าเป็นตา มีความเป็นมืออาชีพทำให้งานแต่งของคุณในวันนั้น เป็นวันที่ดีที่สุดอย่างแน่นอน ราคาไม่แพง ราคาการจัดงานในแต่ละครั้งนั้นไม่แพงอย่างที่คิดแน่นอนหฟากเทียบกับความคุ้มค่าในวันที่แต่งงานที่เราจะได้รับนั้น ด้วยความเป็นมืออาชีพนั้นจะทำให้งานแต่งของคุณนั้นกลายเป็นอีกวันที่น่าจดจำทั้งตัวคุณเอง และ คนรัก และ แขกผู้มีเกรียติที่เข้ามาร่วมงานอย่างแน่นอน รองรับการจัดงานทั้งช่วงเช้า -ช่วงบ่าย อีกเรื่องที่มั่นใจได้เลยนั้นคือ การจัดงานนั้นไม่ว่าจะเป็นงานช่วงเช้า หรือ กระทั่งงานช่วงบ่ายเองก็สามารถจัดการได้อย่างไม่มีปัญหา มีการรองรับการจัดงานในช่วงเวลาเช้า และ บ่ายอย่างแน่นนอนดังนั้นไม่ว่าจะจัดงานตอนไหนก็มั่นใจได้เลน เรือนไทยที่สวยงาม สิ่งสุดท้ายที่ดีที่สุด จาก “ลลิตากรุ๊ป” นั้นคือ “เรือนไทย” ที่เป็นสถานที่จัดงานแต่งที่มั่นใจเลยว่า ได้รับทั้งความสุข ความสวยงาม และ เสน่ห์ความเป็นไทยไปอย่างแน่นอน นี้เป็นเพียงข้อดีเล็ก ๆ จาก […]

5 ร้านเสื้อผ้าแฟชั่นสาวอวบช้อปออนไลน์ได้ พลัสไซส์แค่ไหนก็ใส่สวยมั่นใจ
ในยุคนี้ต้องยอมรับว่าแฟชั่นสาวอวบนั้นมาแรงจริง ๆ สังเกตจากร้านขายเสื้อผ้าพลัสไซส์ที่มีให้เห็นเยอะขึ้น และการที่บรรดาสาวอวบกล้าแต่งกายได้อย่างมั่นใจยิ่งขึ้น ซึ่งถือเป็นเรื่องที่ดีมาก ๆ เพราะนอกจากจะทำให้ตลาดเสื้อผ้าสาวอวบโตขึ้นแล้ว ยังช่วยเติมสีสันให้สาวพลัสไซส์สนุกกับการแต่งตัวได้อย่างไม่จำเจ และสำหรับใครที่รู้ตัวว่าเป็นนักช้อปออนไลน์ ลองมาดู 5 ร้านเสื้อผ้าสาวอวบที่จะทำให้คุณครีเอททุกลุคได้อย่างมั่นใจยิ่งขึ้น 1. Warangkhana Plussize (IG: warangkhana.plussize) สาวอวบคนไหนที่อยากเป็นเจ้าของชุดเดรสออกงานสวย ๆ แนะนำร้านนี้เลย เพราะทางร้านออกแบบเดรสเพื่อให้สาวอวบสวมใส่ออกมาได้สวย โดยเฉพาะเดรสผ้าซาตินเปิดไหล่อันเป็นดีไซน์ซิกเนเจอร์ที่พอสาวอวบสวมใส่จะช่วยอำพรางรูปร่างให้เพรียวยิ่งขึ้น มีให้เลือกหลายสี จับแมทช์กับรองเท้าส้นสูงดีไซน์เรียบ ๆ เท่านี้ก็จบ เหมาะกับการเลือกไปงานแต่งงานเป็นอย่างยิ่ง นอกจากชุดเดรส ทางร้านยังมีกระโปรงเอวสูง และเสื้อดีไซน์สวย ๆ ที่จัดมาให้สาวพลัสไซส์อีกเพียบ 2. Chubby Chubbb (IG: chubby.chubbb) สาว ๆ คนไหนที่ชอบมิกซ์แอนด์แมทช์สไตล์การแต่งตัวให้ไม่ซ้ำ แนะนำให้ไปส่องอินสตาแกรมร้านสาวอวบร้านนี้ได้เลย นั่นก็เพราะมีดีไซน์เสื้อผ้าให้เลือกหลากหลาย ทั้งเดรสสวย ๆ สไตล์สาวหวาน เสื้อยืด เสื้อครอป เสื้อเชิ้ต กางเกงขายาว และกางเกงขาสั้น คอนเซปต์ของร้านคือการนำเสนอเสื้อผ้าสำหรับสาวหวาน ดีไซน์สวยน่ารักใส่ได้ทุกวัน จะแมทช์กับผ้าใบก็สวย จะจับคู่กับรองเท้าส้นสูงก็เก๋ ใครที่รู้ตัวว่าชอบเปลี่ยนสไตล์การแต่งตัวไปเรื่อย […]

เลือกดอกไม้อย่างไร เมื่อให้ไปแล้ว ผู้รับต้องดีใจ
เชื่อว่าหลายคนนั้นอาจจะมองการ “สั่งดอกไม้” ไว้เป็นของขวัญต่าง ๆ ในงานสำคัญต่าง ๆ ไว้แล้วใช่ไหมครับ ? แต่ช้าก่อน ก่อนที่เราจะสั่งดอกไม้ ไปในบทความนี้เรามีทริกซ์ และ วิธีการดี ๆ ในการเลือกดอกไม้มาบอกกันว่าเราควรจะเลือกดอกไม้อย่างไรให้ผู้รับนั้นดีใจ จนลืมเราไม่ลง เรามาลองดูกันเลยดีกว่านะครับ งานแต่ละงานใช้ดอกไม้คนละแบบ ก่อนอื่นเลยเราจะต้องเรียนรู้ไว้ก่อนนะครับ ว่างานแต่ละงาน โอกาสที่ใช้ช่อดอกไม้แต่ละครั้งนั้นแตกต่างกัน ดังนั้นเราจะต้องศึกษาก่อนที่จะเริ่ม สั่งดอกไม้ ว่างานที่เรากำลังจะใช้ ช่อดอกไม้นั้นควรใช้ช่อดอกไม้ชนิดไหน อย่างเช่นงานแต่ง งานรับปริญญา งานสำคัญครบรอบต่าง ๆ หรือ แม้กระทั่งการเยี่ยมคนป่วยเอง ก็มีการจัดช่อดอกไม้ หรือ กระเช้าดอกไม้คนละแบบ ความหมายแต่ละอย่างของดอกไม้ ดอกไม้นั้นไม่ได้มีเพียงแค่สีที่สวยงาม แต่สิ่งที่เป็นเสน่ห์ของดอกไม้นั้นคือ ความหมายของดอกไม้แต่ละดอกด้วยเช่นกัน อาทิเช่น กุหลาบ นั้นก็สื่อถึงความรัก ดอกทานตะวัน ก็สื่อถึงความแสดงความยินดี นับถือ ให้ความเคารพ นอกจากนั้นดอกไม้ชนิดอื่น ๆ ก็มีความหมายที่แตกต่างด้วยเช่นกันดังนั้นถ้าหากเราอยากให้ผู้รับดีใจมากขึ้น โดยของขวัญนั้นเป็นช่อดอกไม้ ให้เราลองใส่ใจในการเลือกช่อดอกไม้ หรือ กระเช้าดอกไม้มากขึ้นนะครับ […]
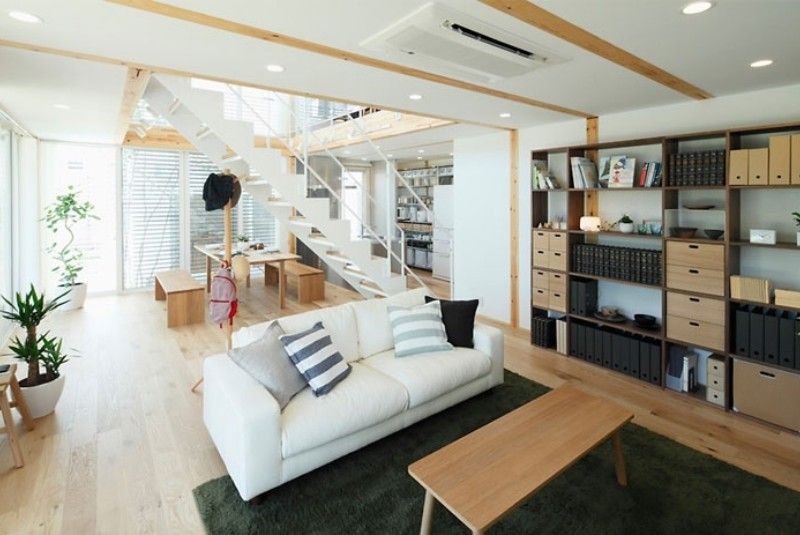
4 เคล็ดลับการตกแต่งภายใน อย่างไรให้สวย โดนใจคนมาเยือน
โดยปกติแล้ว “บ้าน” นั้นเป็นศูนย์รวมของคนในครอบครัวไม่พอ ยังเป็นที่รวมตัวของกลุ่มเพื่อน ๆ หรือ แขก อีกด้วย ดังนั้นการตกแต่ง ภายใน ให้บ้านเราดูมีเสน่ห์ สวย หรือแล้วแต่ความชอบของใครหลาย ๆ คนอย่างแน่นอน ดังนั้นในบทความนี้เราอยากจะนำเสนอ ไอเดียการตกแต่งห้องอย่างไรให้ถูกใจแขกที่มาเยือน จนติดใจ เลือกโทนให้เป็นสีโทนเดียวกัน ไม่จำเป็นต้องเป็นสีเดียวกันก็ได้นะครับ แต่เอาเป็นสีในโทนเดียวกันก็พอ ไม่ให้สีใดสีหนึ่งมากเกินไป เน้นความพอดี จะทำให้ห้องเราดูสบายตากมาขึ้น ซึ่งการไล่ระดับของสีโทนนั้นอยู่ที่ประมาณ 3 สีสำหรับภายในนั้นจะสบายตาที่สุด ดูแล้วไม่ดรู้สึกขัดใจอย่างแน่นอ น เลือกใช้วัสดุเพิ่มเติมเสมอ ไม่ใช่แค่การตกแต่งด้วยเฟอร์นิเจอร์ที่มีอยู่ แต่ ควรจะหาอุปกรณ์เสริมต่าง ๆ มาเพื่อเพิ่มความสวยงามให้กับการตกแต่ง ภายใน ได้ด้วยเช่นกัน อย่างเช่น โคมไฟ กรอบรูป หรือ อุปกรณ์เสริมต่าง ๆ ที่จะช่วยให้ห้อง หรือ ภายในบ้านของเราดูดีขึ้นนั้นเอง สีขาวดำ ยังใช้ได้เสมอ อีกหนึ่งความชอบของการตกแต่ง ภายใน นั้นคือในเรื่องของสี-ขาว และ สีดำ ซึ่งยังใช้ตกแต่งได้เสมอ โดยการตกแต่งด้วยสีดำนั้นเหมาะสำหรับคนที่ต้องการเท่ห์ด้วยสไตล์ที่ดูขรึม […]

3 ข้อดีของการเลือก ใช้บริการส่งอาหารแช่แข็งที่หลายคนอาจจะไม่เคยคิด
ปัจจุบันนั้นขนส่งนั้นมีบริการที่มากมาย หลากหลายมากขึ้นอย่างมาก ไม่เว้นแม้กระทั่ง บริษัทส่งอาหารแช่แข็ง เองก็มีบริการให้แล้วด้วยเช่นกัน ซึ่งสำหรับพ่อค้าแม่ค้าที่ยังไม่ได้เลือกใช้บริการบริษัทส่งอาหารแช่แข็ง วันนี้เราได้รวบรวมข้อดีในส่วนนี้ของบริษัทส่งอาหารแช่แข็ง มาไว้เพื่อเป็นทางเลือกในการตัดสินใจให้กับทุกคนนะครับ สินค้าได้รับการรักษาด้วยอุณหภูมิที่พอเหมาะ บริษัทส่งอาหารแช่แข็ง นั้นจะมีมีการรักษาอุณหภูมิที่พอเหมาะ พอดีโดยการแช่เย็นสินค้าประเภทผัก และ ผลไม้นั้นจะให้รักษาความเป็นอยู่ที่ 0-8 องศาเซลเซียส ซึ่งอยู่ในความเย็นที่พอจะแช่ผลไม้ต่าง ๆ ได้ และ การรักษความเย็นของ Freeze อาหารแช่แข็ง เช่น เนื้อหมู เนื้อปลา เนื้อไก่ หรือของสดต่าง ๆ นั้นจะอยู่ที่ -15 องศาเซลเซียส ทำให้การรักษาเนื้อ และอาหารสดได้นานขึ้น ส่งของถึงเร็ว บริษัทส่งอาหารแช่แข็ง ส่วนมากนั้นจะเป็นการแข่งทางค้าทาง กันดังนั้นในการขนส่งจากบริษัทส่งอาหารแช่แข็งส่วนมากนั้นจะมีการจัดส่ง ที่รวดเร็ว ทำให้อาหารที่มาถึงเรานั้นทั้งสดใหม่ แน่นอน ราคาถูก ตามาตรฐานอย่างแน่นอน อีกหนึ่งความสำคัญของ บริษัทส่งอาหารแช่แข็ง นั้นคือในเรื่องของบริการที่ถูก และ บริการอย่างมาตรฐานแน่นอน โดยถึงแม้ว่าราคาของค่าจัดส่งง นั้นห่างกันไม่มาก แต่มั่นใจว่าแต่ละบริษัทจาก บริษัทส่งอาหารแช่แข็ง […]